Learn how to use RedBaron
This tutorial guides you through the big principles of RedBaron and highlights the most useful helpers and tricks. It is more or less a lighter version of the already existing documentation.
A reminder before starting:
- RedBaron doesn’t do static analysis and will never do (but it’s very likely that it will be combined with tools that do it, like astroid or rope, to bring static analysis into RedBaron or easy source code modification in the others)
The structure of this tutorial is similar to the documentation’s:
- basic principles and how to use it in a shell
- how to query the tree
- how to modify the tree
- how to play with list of things
- miscellaneous but useful stuff
Basic principles
Input and output with the source code in a string:
from redbaron import RedBaron

red = RedBaron("code source as a string")
red.dumps()
Input and output with the source code in a file:
from redbaron import RedBaron

with open("code.py", "r") as source_code:
    red = RedBaron(source_code.read())

with open("code.py", "w") as source_code:
    source_code.write(red.dumps())
Now that you know how to load your code into RedBaron, let’s talk about its principles:
- RedBaron represents the source code as a tree. This is because when you are writing source code (of any classical language), you are actually writing a tree structure in the source file.
- For example: in
1 + 2the top node is+, the left one is1and the right one is2. - In
(1 + 2) + 3the top node is, again,+, but the left one is actually(1 + 2)which is again another+node! This structure is a tree. - The classical approach to handle such a structure is to use an Abstract Syntax Tree (AST) (it is used by compilers and interpreters like cpython).
- RedBaron, by relying on Baron, uses a Full Syntax Tree (FST). It’s like an AST except it keeps every information, included formatting, and is then a lossless representation of the source code. Under the hood, the FST produced by Baron is in JSON and has been thought to be read and used by humans (although not as easily as RedBaron).
- So, when BeautifulSoup wraps the HTML datastructure into objects, RedBaron does the same thing for the FST datastructure and provides a nice way to interact with the source code.
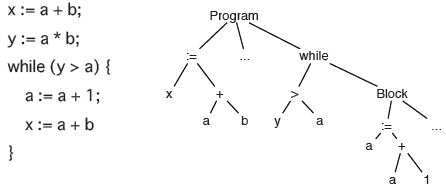
Example of an AST for some language that looks like Go:
While you don’t have to do that to use RedBaron on a daily basis, seeing the produced FST can help your understand RedBaron better (every key that has “_formatting” in its name is formatting related):
In [1]: import json

In [2]: red = RedBaron("1+2")

In [3]: print(json.dumps(red.fst(), indent=4))  # json.dumps is used for pretty printing
[
    {
        "first_formatting": [],
        "value": "+",
        "second_formatting": [],
        "second": {
            "section": "number",
            "type": "int",
            "value": "2"
        },
        "type": "binary_operator",
        "first": {
            "section": "number",
            "type": "int",
            "value": "1"
        }
    }
]
Use it in a shell
Now that we stated the concept of the source code as a tree, let’s explore it.
First, like BeautifulSoup, when used in a shell RedBaron displays the currently selected source code, so you’ll have a direct idea of what you are working on:
In [4]: red = RedBaron("stuff = 1 + 2\nprint 'Beautiful result:', stuff ")

In [5]: red
Out[5]:
0   stuff = 1 + 2
1   print 'Beautiful result:', stuff
2   ' '
You might notice the 0 and the 1 on the left: those are the
indexes of the 2 nodes in the root of the source code. In fact, a source code is
a list of statements so the root node red is a list. See by yourself:
In [6]: red[0]
Out[6]: stuff = 1 + 2

In [7]: red[1]
Out[7]: print 'Beautiful result:', stuff
But now, how to access the attributes? Since reading the doc for every node is boring, RedBaron comes with a helper method that shows you the underlying structure of the currently selected nodes:
In [8]: red[0]
Out[8]: stuff = 1 + 2

In [9]: red[0].help()
AssignmentNode()
  # identifiers: assign, assignment, assignment_, assignmentnode
  operator=''
  target ->
    NameNode()
      # identifiers: name, name_, namenode
      value='stuff'
  annotation ->
    None
  value ->
    BinaryOperatorNode()
      # identifiers: binary_operator, binary_operator_, binaryoperator, binaryoperatornode
      value='+'
      first ->
        IntNode() ...
      second ->
        IntNode() ...
The output might be a bit scary at first, but it’s simply showing you the underlying structure, mapped to Baron JSON’s one.
By the way, RedBaron has nice coloration features if you use ipython as your python shell.
Let’s take it step by step:
- We are on an
AssignmentNode(something likea = b) that has 3 attributes:operator,targetandvalue. - The
operatoris an empty string (it could have been a python operator like+in a case likea += b) targetpoints to another node, aNameNode(you can see this thanks to the arrow->instead of an equal sign=)valuepoints to aBinaryOperatorNode.
To get more information about all the existing kind of nodes, see the documentation: Nodes References Page.
Let’s try it:
In [10]: red[0]
Out[10]: stuff = 1 + 2

In [11]: red[0].operator
Out[11]: ''

In [12]: red[0].target
Out[12]: stuff

In [13]: red[0].value
Out[13]: 1 + 2
For now we saw attributes that are either strings or pointing to other
nodes, respectively called leafs and branches in the tree terminology.
The last kind of attributes that you will encounter are a special case
of the branch nodes: instead of pointing to a single node, they point to
a list of nodes. You can see this in the print statement’s value
attribute:
In [14]: red[1].help()
PrintNode()
  # identifiers: print, print_, printnode
  destination ->
    None
  value ->
    * StringNode()
        # identifiers: string, string_, stringnode
        value="'Beautiful result:'"
    * NameNode()
        # identifiers: name, name_, namenode
        value='stuff'
Notice the * before StringNode and NameNode? It
indicates that they are items of a list. Look:
In [15]: red[1]
Out[15]: print 'Beautiful result:', stuff

In [16]: red[1].value
Out[16]:
0   'Beautiful result:'
1   stuff

In [17]: red[1].value[0]
Out[17]: 'Beautiful result:'

In [18]: red[1].value[1]
Out[18]: stuff
And if we show the help of the value attribute, we clearly see that there is a list of nodes.
In [19]: red[1].value.help()
0 -----------------------------------------------------
StringNode()
  # identifiers: string, string_, stringnode
  value="'Beautiful result:'"
1 -----------------------------------------------------
CommaNode()
  # identifiers: comma, comma_, commanode
2 -----------------------------------------------------
NameNode()
  # identifiers: name, name_, namenode
  value='stuff'
This is similar for the root node, which is itself also a list of nodes:
In [20]: red.help()
0 -----------------------------------------------------
AssignmentNode()
  # identifiers: assign, assignment, assignment_, assignmentnode
  operator=''
  target ->
    NameNode()
      # identifiers: name, name_, namenode
      value='stuff'
  annotation ->
    None
  value ->
    BinaryOperatorNode()
      # identifiers: binary_operator, binary_operator_, binaryoperator, binaryoperatornode
      value='+'
      first ->
        IntNode() ...
      second ->
        IntNode() ...
1 -----------------------------------------------------
EndlNode()
  # identifiers: endl, endl_, endlnode
  value='\n'
  indent=''
2 -----------------------------------------------------
PrintNode()
  # identifiers: print, print_, printnode
  destination ->
    None
  value ->
    * StringNode()
        # identifiers: string, string_, stringnode
        value="'Beautiful result:'"
    * NameNode()
        # identifiers: name, name_, namenode
        value='stuff'
3 -----------------------------------------------------
SpaceNode()
  # identifiers: space, space_, spacenode
  value=' '
And voilà, you now know how to navigate the tree by attributes without having to read any documentation!
If you’re curious about the identifiers outputted by the
.help() method, read on to the next section.
And one last thing: by default .help() stops at a certain
“deepness level” and displays ... instead of going further. To
avoid that, simply pass an integer that indicates the “deepness level”
you want, or give True if you want to display the whole tree.
red.help(4)
red.help(True)
You can read the whole documentation of .help here: .help()
Querying
Querying is inspired by BeautifulSoup. You have access to 2 methods:
.find and .find_all, accepting the same arguments. The
first one returns the first matched node and the second one returns
the list of all the matched nodes.
The first argument is a string that represent the kind of the node you
want to match on. The identifiers section displayed by the
.help() method shows you several strings you can use to identify
a kind of node. For example:
In [21]: red
Out[21]:
0   stuff = 1 + 2
1   print 'Beautiful result:', stuff
2   ' '

In [22]: red.help()
0 -----------------------------------------------------
AssignmentNode()
  # identifiers: assign, assignment, assignment_, assignmentnode
  operator=''
  target ->
    NameNode()
      # identifiers: name, name_, namenode
      value='stuff'
  annotation ->
    None
  value ->
    BinaryOperatorNode()
      # identifiers: binary_operator, binary_operator_, binaryoperator, binaryoperatornode
      value='+'
      first ->
        IntNode() ...
      second ->
        IntNode() ...
1 -----------------------------------------------------
EndlNode()
  # identifiers: endl, endl_, endlnode
  value='\n'
  indent=''
2 -----------------------------------------------------
PrintNode()
  # identifiers: print, print_, printnode
  destination ->
    None
  value ->
    * StringNode()
        # identifiers: string, string_, stringnode
        value="'Beautiful result:'"
    * NameNode()
        # identifiers: name, name_, namenode
        value='stuff'
3 -----------------------------------------------------
SpaceNode()
  # identifiers: space, space_, spacenode
  value=' '

In [23]: red.find("assignment")
Out[23]: stuff = 1 + 2

In [24]: red.find("print")
Out[24]: print 'Beautiful result:', stuff

In [25]: red.find_all("int")
Out[25]:
0   1
1   2
Then, you can pass as many keyword arguments as you want. They will filter the returned list on the attributes of the node and keep only those matching all attributes:
In [26]: red.find("int", value=2)
The only special argument you can pass is recursive that determine if
the query is done recursively. By default it is set at True, just pass
recursive=False to .find or .find_all to avoid that.
Queries are very powerful: you can pass lambdas, regexes, a short hand syntax for regexes and globs, a tuple of string instead of a string for the node kind, a global regex that receives the node (instead of a regex per attribute), etc. You can read all of that in the documentation: Querying.
Finally, .find and .find_all also have a shortcut syntax (exactly like
in BeautifulSoup):
In [27]: red.find("int")
Out[27]: 1

In [28]: red.int
Out[28]: 1

In [29]: red.find_all("int", value=2)
Out[29]:

In [30]: red("int", value=2)
Out[30]:
But be aware that if you do a
red.something_that_can_be_a_node_identifier and this is also not an
attribute of a node, this will raise an AttributeError.
Modification
Nodes modification is extremely simple in RedBaron: you just have to set the attribute of the node you want to modify with a string containing python source code. Just look by yourself:
In [31]: red
Out[31]:
0   stuff = 1 + 2
1   print 'Beautiful result:', stuff
2   ' '

In [32]: red[0].target = "something_else"

In [33]: red[0].value = "42 * 34"

In [34]: red
Out[34]:
0   something_else = 42 * 34
1   print 'Beautiful result:', stuff
2   ' '

In [35]: red[1].value = "'Hello World!'"

In [36]: red
Out[36]:
0   something_else = 42 * 34
1   print 'Hello World!'
2   ' '
Notice that this also works with complex attributes like the body of a function. Here RedBaron makes a lot of effort to correctly format your input so you can pass it pretty much anything:
In [37]: red = RedBaron("def a():\n    pass")

In [38]: red[0].value = "1 + 1"

In [39]: red  # correctly indented
Out[39]:
0   def a():
        1 + 1


In [40]: red[0].value = "\n\n\n           stuff\n"

In [41]: red  # again
Out[41]:
0   def a():


                   stuff
And this works too for more complex situations where the node is indented and followed by another node whose indentation can’t be broken and other low level details that you don’t want to hear about (but if you wish too, this is detailed in the full documentation).
And voilà, easy source code modification! You can also pass RedBaron node
objects or Baron JSON FST that you have obtain is some way or another, for example by
using .copy():
In [42]: red = RedBaron("stuff = 1 + 2\nprint(stuff)")

In [43]: red
Out[43]:
0   stuff = 1 + 2
1   print(stuff)

In [44]: i = red[0].value.copy()

In [45]: red[1].value = i

In [46]: red
Out[46]:
0   stuff = 1 + 2
1   print1 + 2
You can also replace a node in place using the .replace() method.
Warning: the .replace() expects that the string you pass
represents a whole valid python program (so for example: .replace("*args,
**kwargs") won’t work). This limitation should be raised in the future.
In [47]: red
Out[47]:
0   stuff = 1 + 2
1   print1 + 2

In [48]: red[0].value.replace("1234")

In [49]: red
Out[49]:
0   stuff = 1234
1   print1 + 2
This is generally very useful when working on queries. For example (a real life
example), here is the code to replace every print stuff (prints
statement of one argument, an example with multiple arguments is left as an exercise to the
reader) with logger.debug(stuff):
red("print", value=lambda x: len(x) == 1).map(lambda x: x.replace("logger.debug(%s)" % x.value.dumps()))
(.map() will be covered at the end of the tutorial but should speak for itself.)
You can read everything about modifications in RedBaron here: Modifying
Playing with list of nodes
The last big concept of RedBaron covered in this tutorial is how to handle list of nodes. The problem for
short is that, for a python developer, the list [1, 2, 3] has 3 items
but it has 5 items in the FST world, because it needs to take into account
the commas. It is not sufficient to know that it is a comma separated
list because each comma can have a different formatting. This is
a pattern you find in every list of nodes, the separator being
either commas, dots (eg: a.b(c)[d]) or end of line characters (for
lines of code).
Having to deal with those separators is extremely annoying and error prone, so, RedBaron offers an abstraction that hides all this for you! You just have to deal with those list of nodes like if they were regular python list and everything will be fine. See by yourself:
In [50]: red = RedBaron("[1, 2, 3]")

In [51]: red.help()
0 -----------------------------------------------------
ListNode()
  # identifiers: list, list_, listnode
  value ->
    * IntNode()
        # identifiers: int, int_, intnode
        value='1'
    * IntNode()
        # identifiers: int, int_, intnode
        value='2'
    * IntNode()
        # identifiers: int, int_, intnode
        value='3'

In [52]: red[0].value  # see: no explicit commas to deal with
Out[52]:
0   1
1   2
2   3

In [53]: red[0].value.append("4")

In [54]: red  # comma has been added for us
Out[54]: 0   [1, 2, 3, 4]
This abstraction is called a proxy list. They can even detect indentation style for comma separated lists:
In [55]: red = RedBaron("[\n    1,\n    2,\n    3,\n]")

In [56]: red
Out[56]:
0   [
        1,
        2,
        3,
    ]

In [57]: red[0].value.append("caramba")

In [58]: red
Out[58]:
0   [
        1,
        2,
        3,
        caramba,
    ]
This also work with nodes separated by dots:
In [59]: red = RedBaron("a.b(c)[d]")

In [60]: red
Out[60]: 0   a.b(c)[d]

In [61]: red[0].value.extend(["e", "(f)", "[g:h]"])

In [62]: red
Out[62]: 0   a.b(c)[d].e(f)[g:h]
And lines of code (note that the blank lines are explicitly shown and it is intended as such, see the documentation for more information: Proxy List):
In [63]: red = RedBaron("a = 1\n\nprint(a)")

In [64]: red
Out[64]:
0   a = 1
1   '\n'
2   print(a)

In [65]: red.insert(1, "if a:\n    print('a == 1')")

In [66]: red
Out[66]:
0   a = 1
1   if a:
        print('a == 1')

2   '\n'
3   print(a)
The important things to remember are that:
- Every method and protocol of python lists (except
sortandreversed) works on proxy list. - And every node list in python is wrapped by a proxy list.
The raw list is stored on the .node_list attribute of the proxy list:
In [67]: red = RedBaron("[1, 2, 3]")

In [68]: red[0].node_list
Out[68]:
0   1
1   ,
2   2
3   ,
4   3
Warning: the proxyfied list and the proxy list are only synced from the proxy list to the raw list. If you start to modify the raw list, don’t use the proxy list anymore or you’ll have strange bugs! This might change in the future.
One last thing: if the proxy list is stored on the .value attribute,
you can directly call the methods on the holder node.
This is done because it is more intuitive, see by yourself:
red = RedBaron("[1, 2, 3]")

red[0].append("4")  # is exactly the same than the next line
red[0].value.append("4")
Misc things
A short list of useful features of RedBaron:
.map, a method of RedBaron lists that takes a callable (like a lambda or a function), apply it to every one of its members and returns a RedBaron list containing the result of the call.applysame than.mapexcept it returns a RedBaron list of the nodes on which the callable has been applied (i.e. the members before the call instead of the members after the call) (for simplicity we uses theintbuiltin function here, you might want to look atto_pythonin the future for a more generic conversion operation)
In [69]: red = RedBaron("[1, 2, 3]")

In [70]: red("int").map(lambda x: int(x.value) + 42)
Out[70]:
0   43
1   44
2   45

In [71]: red("int").apply(lambda x: int(x.value) + 42)
Out[71]:
0   1
1   2
2   3
.filter, another method of RedBaron list, it takes a callable and return a RedBaron list containing the nodes for which the callable has returned True (or something that is tested has True in python)
In [72]: red = RedBaron("[1, 2, 3]")

In [73]: red("int").filter(lambda x: int(x.value) % 2 == 1)  # odd numbers
Out[73]:
0   1
1   3
.nextgives the node just after the current one if the node is in a list.previousdoes the inverse.parentgives the holder of this node
In [74]: red = RedBaron("[1, 2, 3]")

In [75]: red.int_
Out[75]: 1

In [76]: red.int_.next
Out[76]: ,

In [77]: red.int_.previous  # None because nothing is behind it

In [78]: red.int_.parent
Out[78]: [1, 2, 3]
And you can find all the others various RedBaron features here: Other